About
Applications
HoudiniUnreal EngineUnity 3DNukeMayaBlenderZBrushPythonMixed RealityMachine LearningGraphic DesignExtrasAboutAffinity
Clear User Data
Press CTRL key and open respective tool at the same time to access the following dialog box to reset presets and user data. This can help in resolving visibility issues with menus or toolbars, as an example.

Missing Fonts
The Locate button navigates to the location within the project where the missing font occurs. Fonts are read from the Font Settings stored in the Windows OS (Start Menu > Font Settings), which is where new fonts can be added and then read by the various applications, including Affinity. After installing the fonts here, I restart Affinity and the new fonts appear in the list of available fonts.
This is what has worked for me, but I haven't had a chance to look through the Affinity documentation to see if there's a more direct way to address missing fonts on an individual project file basis.

Macros
The process of creating and using macros in Affinity Photo is synonymous with actions in Photoshop.
Navigate to View > Studio > Macro
In the Macro panel:
- Select Record button to start recording actions.
- Note the actions being recorded and added to the list.
- Select Stop button when completed with actions.

Available Options (buttons at top left corner):
- Export (*.afmacro)
- Import (*.afmacro)
- Use the Play button to run the macro once imported
- Save to Library
- Default library is Default, but others can be added also.
Batch Processing
Using the batch processes allows for multiple macros to be applied to multiple images at the same time and through an automated process. This is very useful for repetitive processes.
Navigate to File > New Batch Job...
In the dialog that appears:
- Add the images to the Sources section.
- Define the Output.
- The most common solution is to Save into: and define the folder to be saved.
- Using the Save into original location will overwrite the original images.
- Define the file type.
- Each file type has an additional menu for more specifics, as shown in the image below.
- From the Available Macros, use the Apply button to add macros to the list in the order they are to be applied.
- Select OK when ready to process.


Alignment Options
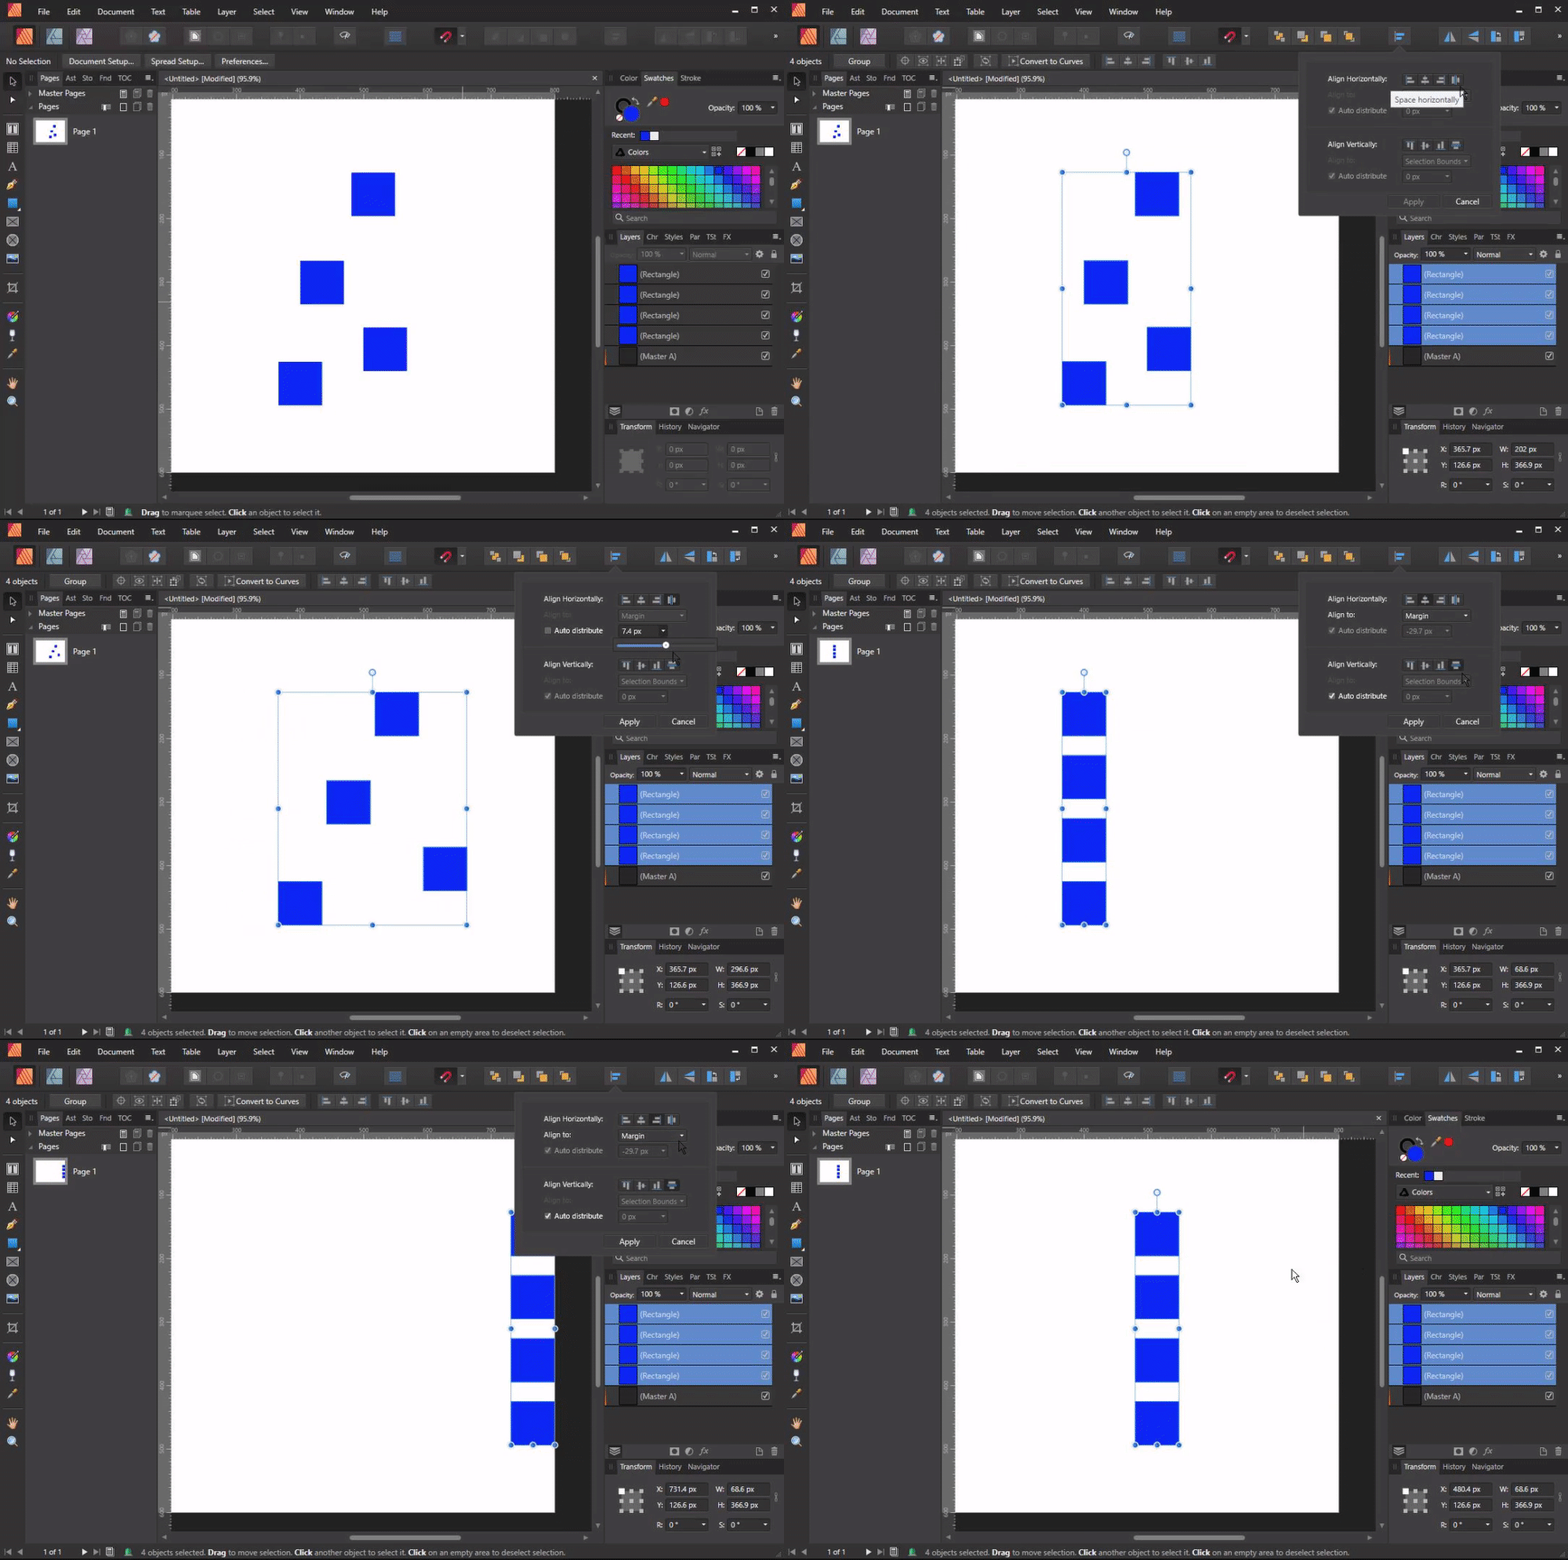
The Alignment button on the toolbar expands to offer options for alignment, spacing and distribution. This is a quick and easy way to align objects in a scene by viewing and testing the modifications before applying them with the Apply button within the options.

Kerning Individual Spaces
The spaces between individual characters can be increased or decreased by pressing ALT + Right Arrow or ALT + Left Arrow.

Circular Array
Use the Show Rotation Center to select the pivot point for the rotation. Place as necessary.

Select the object to be array'ed and Ctrl+J to duplicate. With it still selected, Ctrl+J again to duplicate and automatically locate at the same interval. Continue as necessary.

Cut/Break Path
- Select the path in the Layers panel.
- Verify that it has been converted to a curve by right-clicking and Convert To Curves (Ctrl+Return)
- Use the node tool (A) to add the point at which to cut the path.
- With the new point still selected, select the Break Curve icon (left-most) to break the path

Text On Path
- Create the design or shape you would like to add text to.
- Select your design/shape.
- Select the artistic text tool in the left toolbar. ...
- You can now type your text.
- Another way to create a text path is to select your design/shape and go to Layer > convert to text path.
Vector To DWG
With AutoCAD being able to import vector content from PDFs, I've been exporting PDFs from Affinity Designer and using the PDFIMPORT command in AutoCAD to convert the vector content into linework. Text and linework seems to translate okay, though I haven't tried solid fills.
Restore Quality with Resize Image
When an image is shrunk, quality is often lost and will sometimes get a slightly blurred image. Use the Unsharp Mask Filter to compensate for this.
- Filters > Unsharp Mask Filter
Affinity Keyboard Shortcuts
Name | Shortcut | Notes |
|---|---|---|
Free Transform |
| |
Brush Opacity | Number keys | Ex. 50% is the |
Brush Size (Decrease, Increase) |
| |
Brush Hardness/Softness |
|
Figma
General
Integrates with Notion.
Operations
Progress Bar With Figmotion
Figmotion requires content being animated to be a frame.
Collaboration
With a shared link, users can see where the others' mouse cursor is positioned. Note that the username 'Anonymous' appears through the publicly shared link to the Figma workspace.

Mobile Application
For visualizing and interacting with prototype.
Figma Mirror
Figma Mirror allows you to view your designs from the Figma desktop app live across all of your iOS devices. Any Network, Any Time: You don't need to connect via USB or be on the same Wi-Fi network, just log in with your Figma username and password and any frame you select in Figma will show up on...
apps.apple.com

Resources
Graphic Design Tools
UX/UI Tools
On This Page
- Affinity
- Clear User Data
- Missing Fonts
- Macros
- Batch Processing
- Alignment Options
- Kerning Individual Spaces
- Circular Array
- Cut/Break Path
- Text On Path
- Vector To DWG
- Restore Quality with Resize Image
- Affinity Keyboard Shortcuts
- Figma
- General
- Operations
- Progress Bar With Figmotion
- Collaboration
- Mobile Application
- Resources
- Graphic Design Tools
- UX/UI Tools