About
Applications
HoudiniUnreal EngineUnity 3DNukeMayaBlenderZBrushPythonMixed RealityMachine LearningGraphic DesignExtrasAboutAmazon EC2
Amazon Elastic Compute Cloud (Amazon EC2)
Web service providing resizable cloud computing; sort of like a virtual machine (VM)
Quick Checks
- Verify that instances are turned off to limit usage
- Verify security for ports
Workflow
- Create EC2 Ubuntu instance on AWS
- Connect to EC2 instance via PuTTY SSH client on Windows
- Setup instance with applicable Python libraries, including Jupyter access, Spark & Hadoop
- Access Jupyter Notebook for data operations
- Terminate EC2 instance when complete
EC2 Setup Guide
Create EC2 Instance
- Amazon Machine Image (AMI)
- Preference is an Ubuntu Server
- Instance Type
- CPU/Memory: Specify as applicable to project requirements
- Instance Configuration
- Number of Instances: 1, unless intent is to deploy to cluster of instances
- Storage: 8 GB General Purpose SSD (Default)
- Tag Instance
- Security Group Configuration
- Review Instance
- Confirm, and Launch
- Key Pair
- Create new, or select existing, as applicable
- Key pair name: Specify unique name
- Download Key Pair .pem file
- Launch Instances
Key: name (ex. myinstance)
Value: webserver (ex. mymachine)
Note that these values are case-sensitive.
Create a new security group
Type: Set to specified security profile, or leave at All traffic, though it is not recommended.
IMPORTANT: Verify this .pem file is downloaded before closing this dialog box.
SSH Setup
The intent of this step is to remotely connect to command line of EC2 instance with an SSH (Secure Shell Connection) for Windows.
Step-by-Step Reference Guide
Collect Support Files
Download PuTTY
- PuTTY allows for creating a secure shell instance to the EC2 instance.
- Binaries to download:
- putty.exe
- puttygen.exe
Collect EC2 information from AWS Dashboard
- Instance ID
- Public DNS
- Private Key (.pem file)
- Enable inbound SSH traffic
This operation is dependent on the security profile specified, but if All traffic was selected in instance creation, then this has been enabled.
Convert Key Via PuTTYgen
Since PuTTY does not natively support the .pem format generated by EC2, so it needs to be converted by using PuTTYgen.
- Run PuTTYgen.exe
- Select Type of key to generate: RSA
- Load .pem file
- Save private key
- Name: Specify unique
- Passphrase: Specify as needed for security profile
- Save in .ppk file format
- Close PuTTYgen.exe
RSA is a private-key cryptosystem for an SSL/TLS session
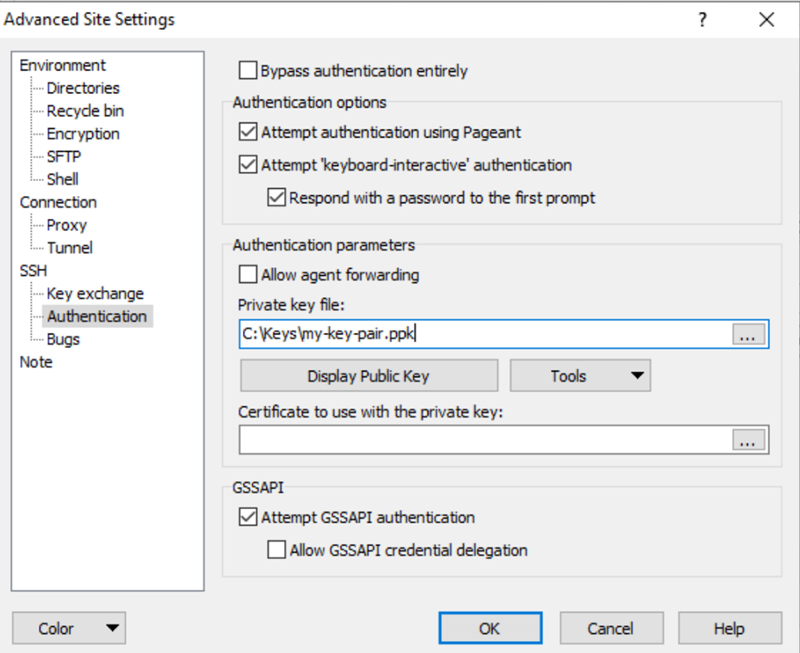
Configure SSH Client Via PuTTY
With the refined key, use PuTTY to configure the access to the EC2 instance.
- Run PuTTY.exe
- Host Name
- Connection type:
SSH - Port:
22 - Category > Connection > SSH > Auth
- Open to start SSH Client.
- Trust the Security Alert dialog box that appears since the server being connected to is the intended one.
Session Configuration:
Format: user_name@public_dns_name
user_name: ubuntu, for Ubuntu Server (check docs for other server usernames
public_dns_name: Public DNS from EC2 console
Browse and load .ppk file
Access EC2 Instance With SSH Client
With PuTTY initialized and opened, shell client opens as follows:
When complete with use of EC2 instance, close shell and terminate instance on AWS Console.
Actions > Instance State > Terminate
Instance termination is critical for when the instance is no longer needed so as not to log active usage of charged services.
Jupyter & Spark Setup Guide
Overview
The intent of this process is to set up Anaconda Python, Jupyter, Spark, and Hadoop within the EC2 Instance.
Reference Step-by-Step Guide

Anaconda & Python
Install Anaconda
This process installs Anaconda and the Jupyter notebook with its own Python and all accompanying libraries to the specified directory.
- Access the EC2 instance with PuTTY.
- Specify version of Anaconda from the following link of available versions to acquire the weblink: https://repo.anaconda.com/archive/
- Confirm install to
/home/ubuntu/anaconda3 - Press
Enterkey to navigate through agreement and enteryesfor agreement acceptance. - Enter
yesfor installer to prepend the Anaconda3 install location toPATHin/home/ubuntu/.bashrc.
ubuntu@ip:~$ wget <weblink_to_anaconda.sh_installer>
ubuntu@ip:~$ bash <anaconda.sh_installer>Python Versions
While the newly installed Anaconda has its own version of Python, Ubuntu already comes packaged with Python, so the following will confirm which Python is being actively utilized.
ubuntu@ip:~$ which pythonWhen checking the version of Python, the default Ubuntu version is located at /usr/bin/python, while Anaconda's version is located at /home/ubuntu/anaconda3/bin/python. The following changes the active Python to the Anaconda version.
ubuntu@ip:~$ source .bashrcJupyter Notebook
Configuration
While Jupyter comes with Anaconda, it needs to be configured for use within this EC2 Ubuntu environment.
- Create the Jupyter Notebook configuration file.
- Create a directory for storing certifications.
- Generate the applicable certification files.
- Populate the fields for the newly created certification file/s, as applicable.
ubuntu@ip:~$ jupyter notebook --generate-configNote that the configuration file is created and stored at /home/ubuntu/.jupyter/jupyter_notebook_config.py
ubuntu@ip:~$ jupyter notebook --generate-configubuntu@ip:~$ sudo openssl req -x509 -nodes -days 365 -newkey rsa:1024 -keyout mycert.pem -out mycert.pemCountry Name (2 letter code) [AU]:
State or Province Name (full name) [Some-State]:
Locality Name (e.g., city) []:
Organization Name (e.g., company) [Internet Widgits Pty Ltd]:
Organizational Unit Name (e.g., section) []:
Common Name (e.g., server FQDN or YOUR name) []:
Email Address []: Document the location where this .pem file is located on the EC2 instance; it will be needed in the next step.
Permissions
Before attempting to access the Jupyter Notebook, note that the ownership of the mycert.pem file needs to be addressed by way of the following. Change directory to the certs directory and input the following to change the group ownership of the certification file to the 'ubuntu' user.
ubuntu@ip:~$ sudo chown ubuntu:root mycert.pemThe above is noted in several troubleshooting documentation sites, as noted below. The Jupyter Notebook has issues being accessed via the browser and notes the following error. However the above step has shown to resolve the permission issue required to bypass the error.
Error:
Permission Error: [Errno 13] Permission denied
Resources:
- https://stackoverflow.com/questions/18551556/permission-denied-publickey-when-ssh-access-to-amazon-ec2-instance
- https://stackoverflow.com/questions/53097180/permissionerror-errno-13-permission-denied-when-accessing-to-aws-ec2
- https://stackoverflow.com/questions/8193768/trying-to-ssh-into-an-amazon-ec2-instance-permission-error?rq=1
Supporting Frameworks & Libraries
In support of the Conda environment, the following need to be installed on the EC2 instance, if not already accessible:
- Java
- Scala
- pip for Conda
- py4j
- findspark
- Spark
- Hadoop
pip for Conda
- Install Anaconda's version of pip
- Confirm pip installation
ubuntu@ip:~$ conda install pipubuntu@ip:~$ which pipIt should be installed to the /home/ubuntu/anaconda3/bin/pip directory.
- Confirm which Python libraries are installed to Conda
ubuntu@ip:~$ conda listpy4j Library
This library allows Python to connect to Java
- Install
py4jlibrary
ubuntu@ip:~$ pip install py4jfindspark Library
This library makes pyspark importable as a regular library.
- Install
findsparkLibrary
ubuntu@ip:~$ pip install -q findsparkJupyter Notebook Utilization
Once applicable libraries and configurations are setup, access the Jupyter Notebook with
ubuntu@ip:~$ jupyter notebookand by accessing the following web address:
https://<EC2_instance_public_ip>:8888
Creating a new notebook should provide the opportunity to test the configuration and installation for using Spark.

Close Jupyter Notebook
Back in the shell, press CTRL + C to exit Jupyter Notebook.
Enter y to confirm notebook shutdown
Terminate EC2 Instance
Right-click on instance in AWS Console and Terminate.
On This Page
- Amazon EC2
- Quick Checks
- Workflow
- EC2 Setup Guide
- Create EC2 Instance
- SSH Setup
- Collect Support Files
- Convert Key Via PuTTYgen
- Configure SSH Client Via PuTTY
- Access EC2 Instance With SSH Client
- Jupyter & Spark Setup Guide
- Overview
- Anaconda & Python
- Install Anaconda
- Python Versions
- Jupyter Notebook
- Configuration
- Permissions
- Supporting Frameworks & Libraries
- pip for Conda
- py4j Library
- findspark Library
- Jupyter Notebook Utilization
- Close Jupyter Notebook
- Terminate EC2 Instance