About
Applications
HoudiniUnreal EngineUnity 3DNukeMayaBlenderZBrushPythonMixed RealityMachine LearningGraphic DesignExtrasAboutGeneral
Settings
Environment Variables
This setting allows for project-specific environment variables. Directory paths for each can be added sequentially and separated by a semicolon. Note the variable name "PYTHONPATH".

Confirm variable setup by outputting the path in Bash terminal, which returns the directory path.
$ echo $PYTHONPATHPerformance Tuning
Note that Power Save mode disables code inspection.
Check bottom right corner for memory usage notification. Right-click bottom toolbar and enable Memory Indicator.
Access Help > Change Memory Settings for modifications from default.
Source:
Wrap Text
By default, wrap text is not enabled in viewport, but can be via:
View > Active Editor > Soft-Wrap
PyCharm
Settings
Configure Source Root Directories
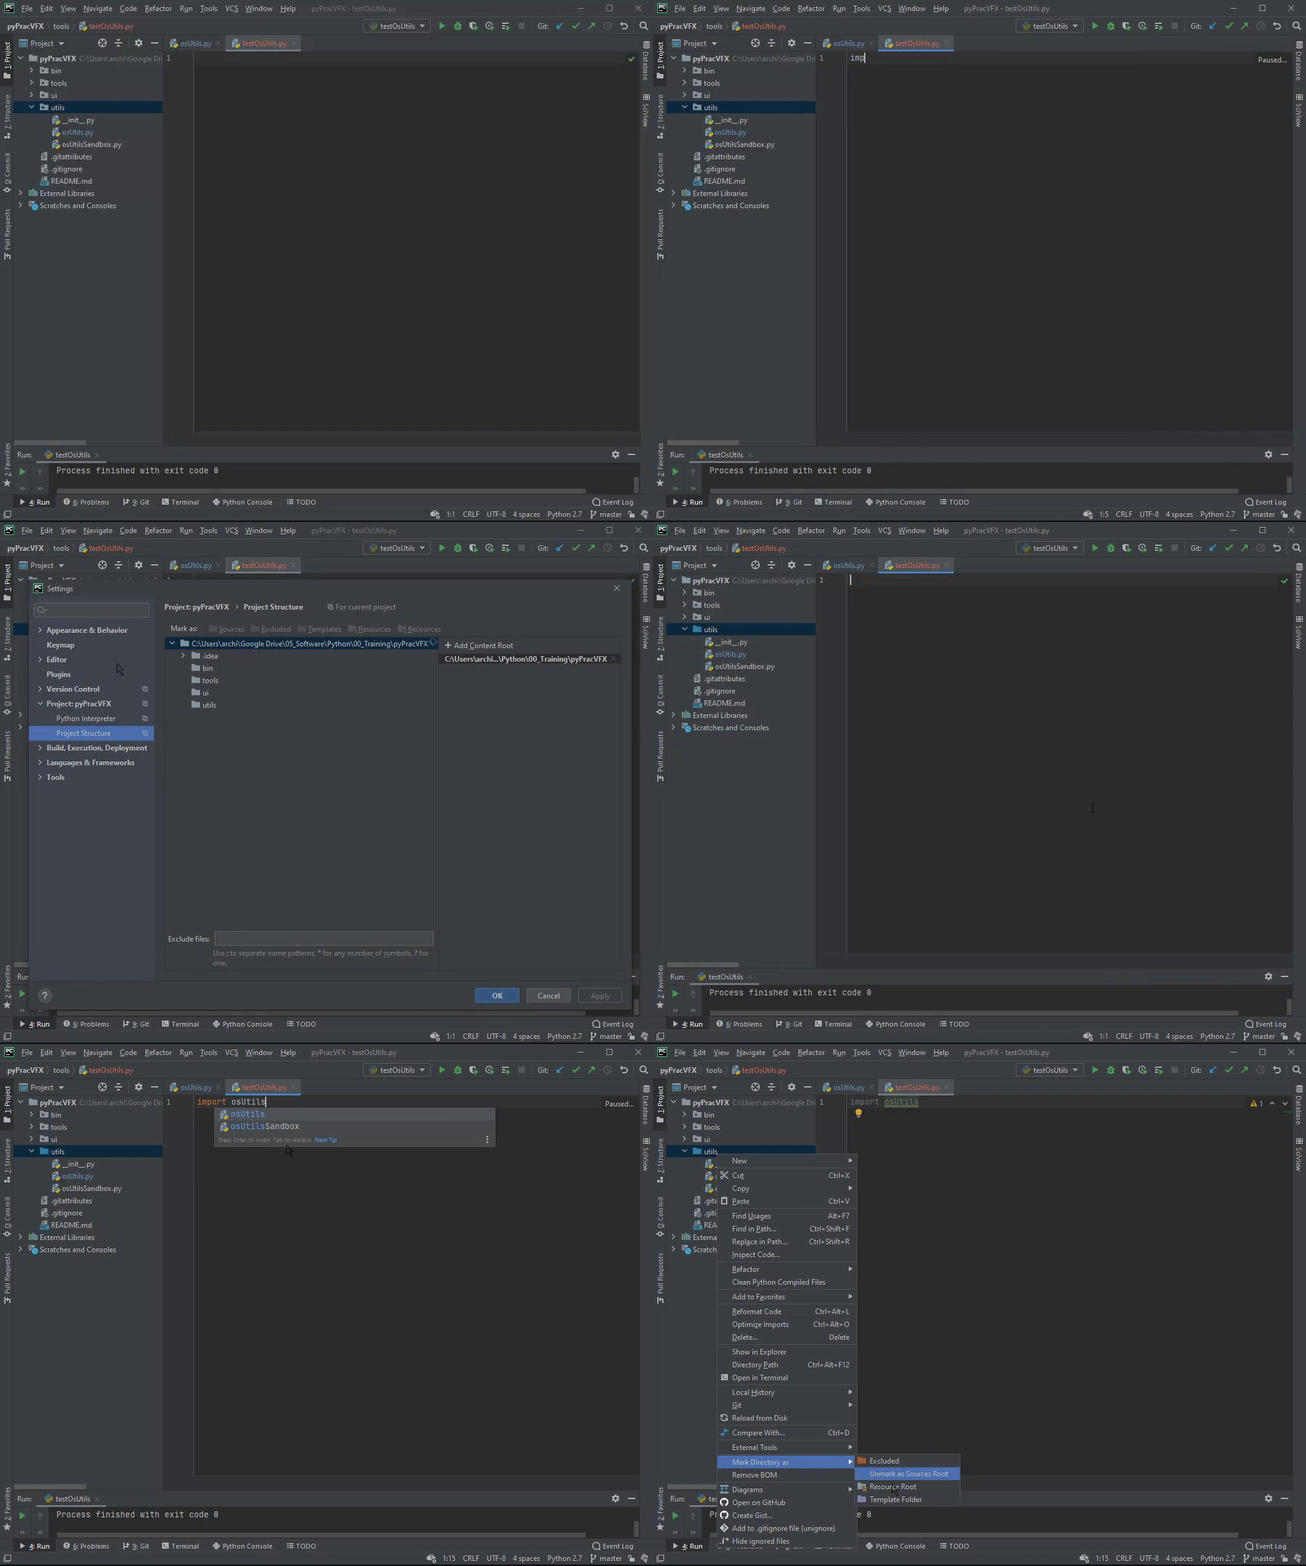
Subfolders within the Content Root folder can be configured to be noted as Resources, Sources, Templates, or Excluded. Note there are 2 ways to assign this configuration to a folder: via Settings and by right-clicking the folder for options.

Source: https://www.jetbrains.com/help/pycharm/configuring-project-structure.html
Link Stub File in PyCharm
In this example, the Python stub file created by UE4 when the Python plugin is enabled is linked to the Python virtual environment so that it can be accessed from within PyCharm.

Filesize Limitation Note
The filesize of the stub file may prevent PyCharm from recognizing the data, but this can be modified via Help > Edit Custom Properties..., which opens the idea.properties file and it's filesize parameter. Increasing it and saving the file may support PyCharm accessing the stub file.
Source: https://www.jetbrains.com/help/pycharm/stubs.html
External Documentation:
Accessing System Arg
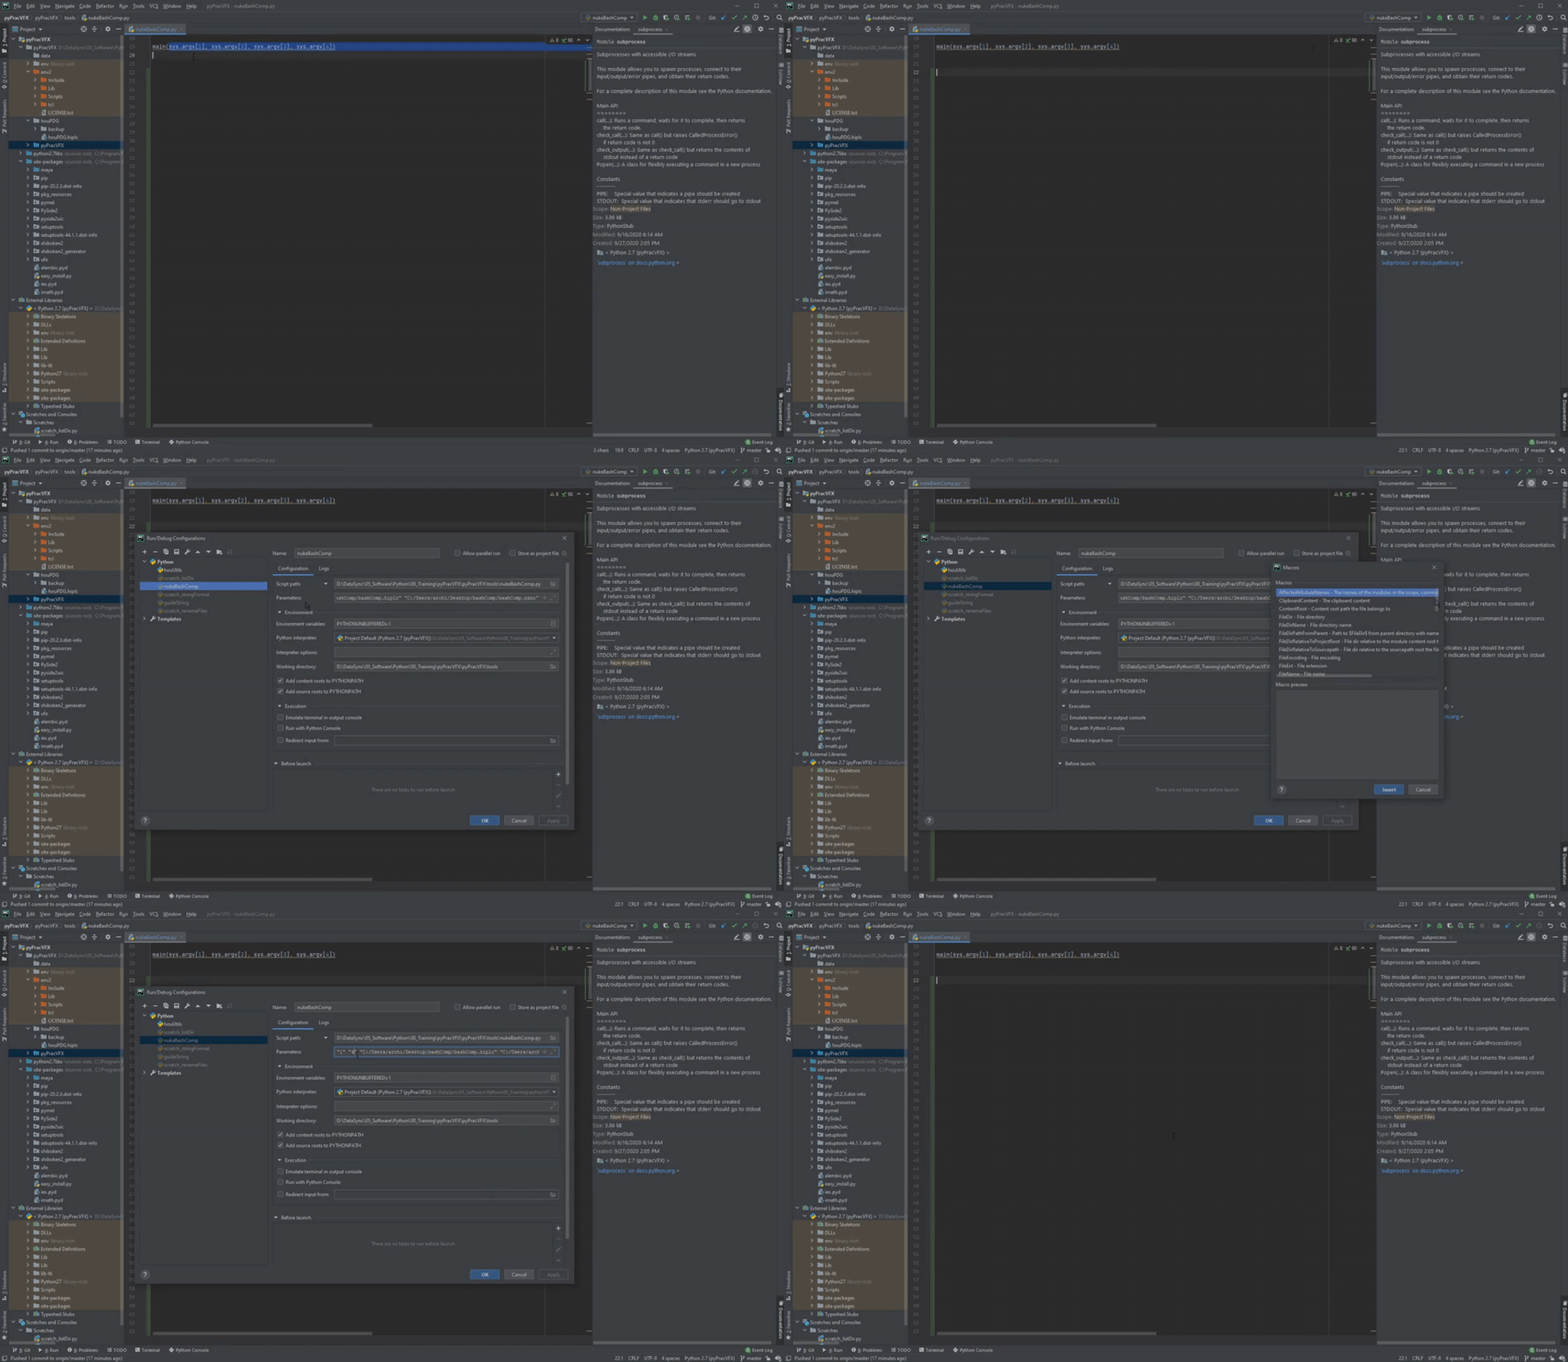
Edit Configurations > Configuration tab > Parameters

Git Bash in Python Terminal

Intellisense & File Size Limit
Default is 2500 KB
Configure the following to change: Help > Edit Custom Properties
idea.properties file opens (and creates a new one if one did not already exist)
Add the following and update file size value accordingly:
idea.max.intellisense.filesize=3500Save and close the idea.properties file.
In PyCharm, File > Invalidate Caches / Restart
This can also be updated via the Registry.
Source: https://www.jetbrains.com/help/objc/configuring-file-size-limit.html#file-length-limit
.pyc Files
Even though Python is an interpreted language (vs. compiled), the interpreter compiles source code to 'byte code' for use in the virtual machine.
Corresponding .pyc files are generated when .py files are imported for use in other files.
Source: https://stackoverflow.com/questions/2998215/if-python-is-interpreted-what-are-pyc-files
Configure Conda Environment
Install Anaconda
Verify that Add Anaconda3 to my PATH environment variable is not enabled.
Disable Register Anaconda3 as my default Python since there are multiple versions of Anaconda and Python running on system.
Install to following location. This can vary, but all installations are collected here for personal preference.
C:\Users\<username>\anacondaSource: https://docs.anaconda.com/anaconda/install/windows/
Add Conda Environment in PyCharm

- Access
File>Settings>Project>Python Interpreter - Add new Python Interpreter using cog icon at top right.
- Select
Conda Environmentand createNew Environment. Location: File path to where the new Conda environment is to be located.Python Version: Verify which version is intended to be used.Conda executable: File path to conda.exe file from Anaconda installation noted above.Make available to all projects: Enable.
Source: https://docs.anaconda.com/anaconda/user-guide/tasks/pycharm/
Install Packages in Anaconda
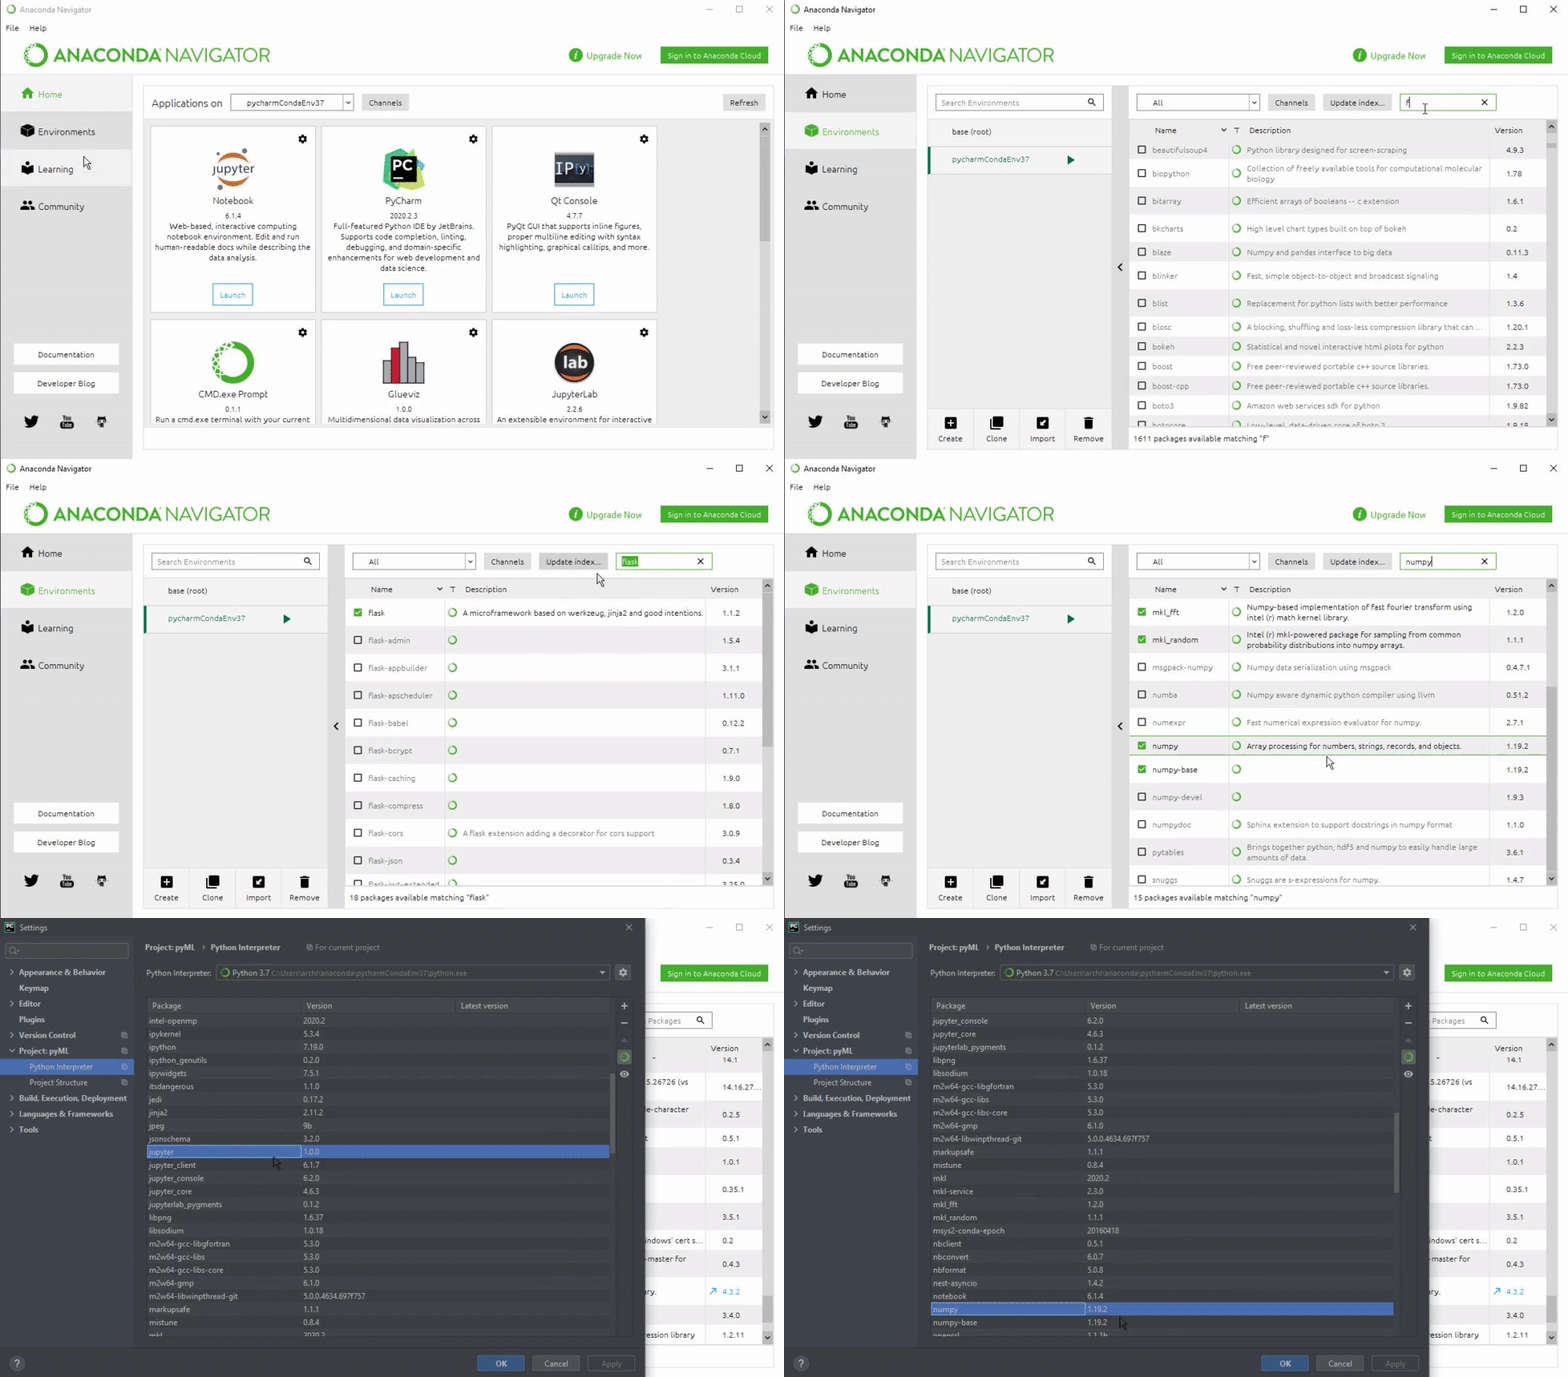
While PyCharm has the option to install and coordinate environment packages, the installed Anaconda Navigator has a similar user-friendly UI for managing packages in all Conda environments installed on the system. As part of the setup for the Conda environment in PyCharm, verify that the following packages are installed, per the Anaconda documentation link directly above.
- flask
- jupyter
Installing packages via the Anaconda Navigator will also update the packages list ready by the Conda environment in PyCharm, confirming that they were installed and recognized. The image below shows the above packages as well as others, like NumPy being installed via the Anaconda Navigator.

Jupyter Notebook
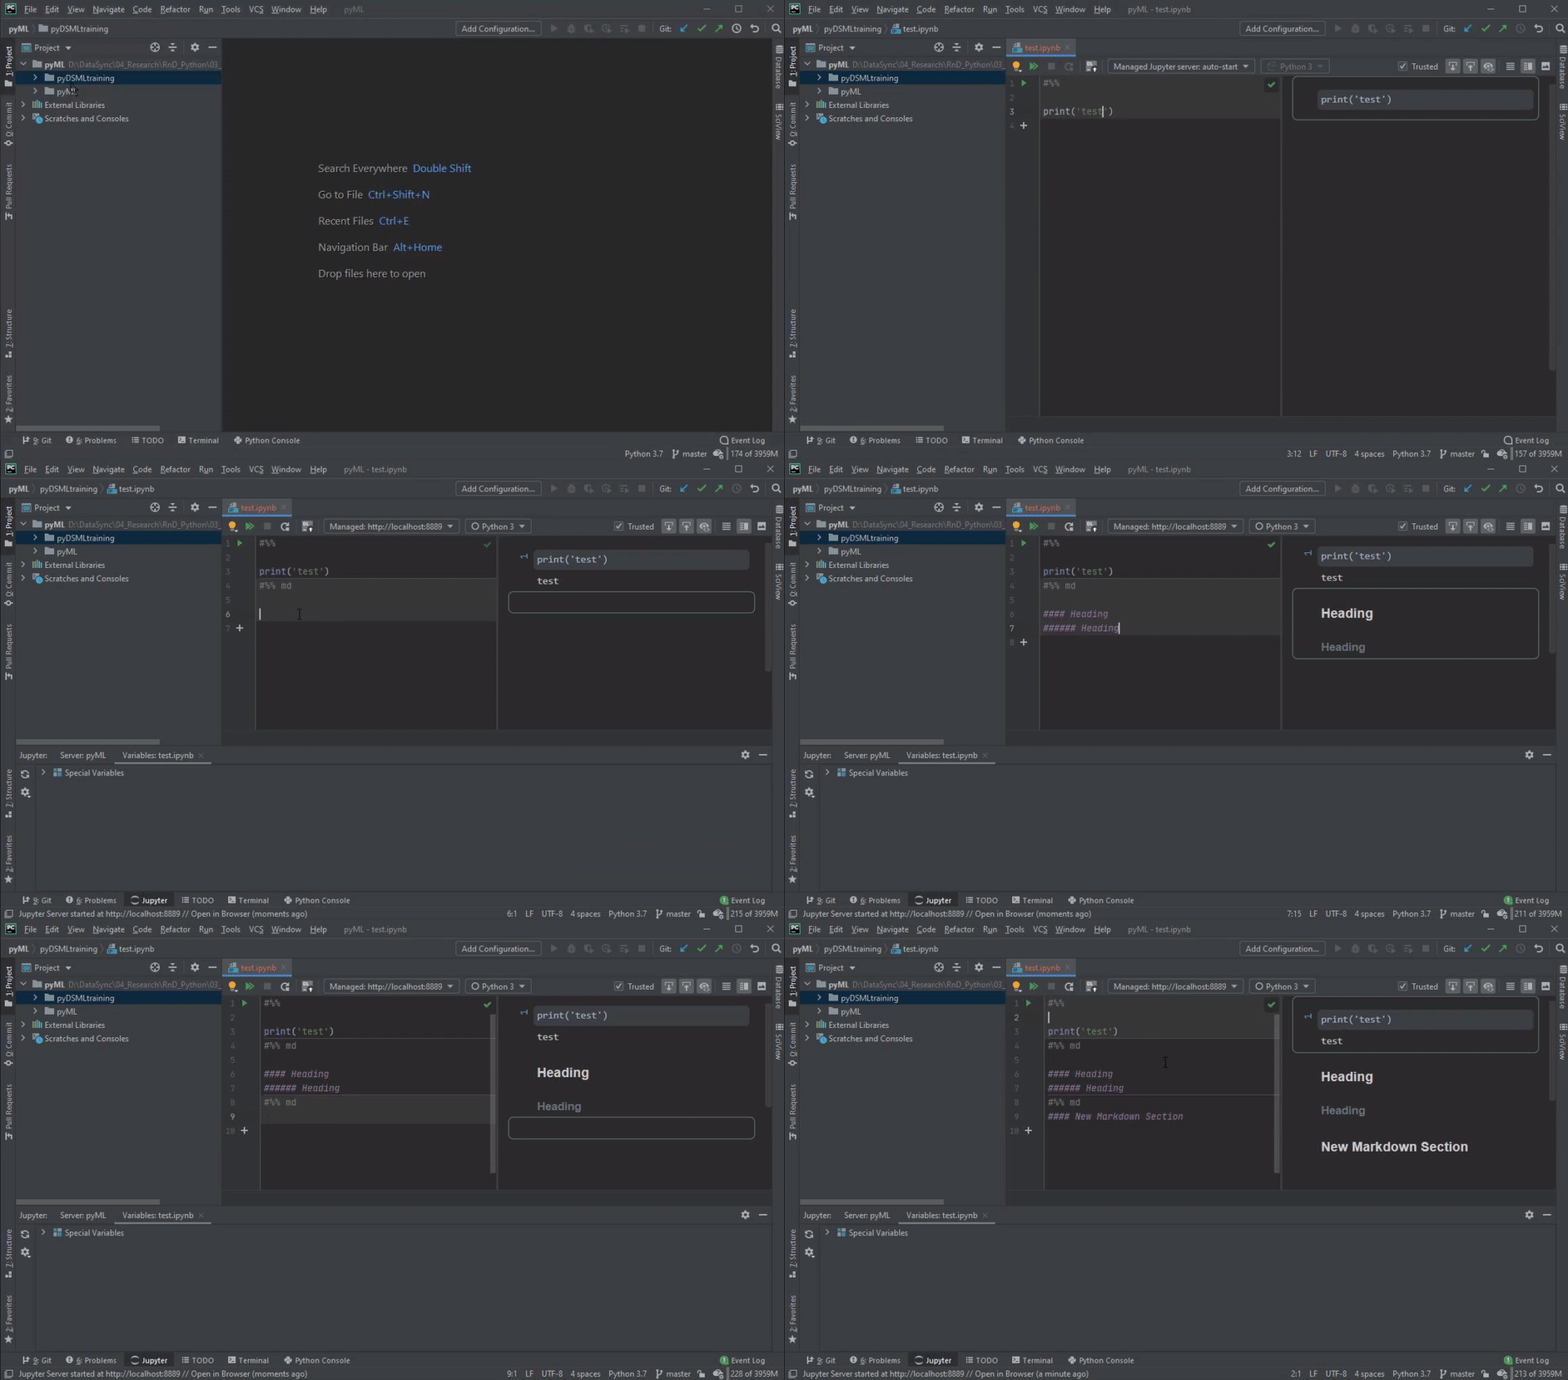
The source link below outlines all of the operations in PyCharm to use Jupyter notebooks. The notes that follow are specific instances of encountered issues with operating Jupyter notebooks in PyCharm and resolutions, as well as some key tips.
Source: https://www.jetbrains.com/help/pycharm/jupyter-notebook-support.html
Configure Jupyter Server
Automatic (default)
- Once the Jupyter package has been installed to the Conda environment to be used in PyCharm, the Jupyter Server should use the default settings to initiate the server when prompted to execute a Jupyter notebook cell.
Manual
- However, if there are instances where the connection cannot be made or it does not recognize the Jupyter package and sees it as missing, then the server configuration can be set manually.
- Start up an Anaconda prompt from the Windows Start and run the following to initiate a new server connection. The same command prompt output will result if the Jupyter Notebook is started using the Windows Start menu item, rather than starting the command prompt.
- The output in the command prompt will list the server and token, which can then be copied and pasted into the PyCharm Settings for Jupyter, as shown in the image below.
jupyter notebook
Sources
- https://youtrack.jetbrains.com/issue/PY-35389?_ga=2.105733062.495441074.1605626361-992679493.1605626361
- https://youtrack.jetbrains.com/issue/PY-39047?_ga=2.38686950.495441074.1605626361-992679493.1605626361
- https://intellij-support.jetbrains.com/hc/en-us/community/posts/360009474619--Jupyter-package-is-not-installed-using-system-Python-3-8-and-yes-it-is-installed
Comments & Markdown

Operation Execution Order
Verify upstream code cells are run and executed before referencing them in downstream code cells, otherwise they will not run or have the latest updates.
Monitor Memory Heap
With the Jupyter Server relying on the Java Virtual Machine (JVM), the memory allocations within PyCharm need to be monitored. The following link outlines memory management and most importantly, memory usage notifications when thresholds are being reached or exceeded.
On This Page
- General
- Settings
- Environment Variables
- Performance Tuning
- Wrap Text
- PyCharm
- Settings
- Configure Source Root Directories
- Link Stub File in PyCharm
- Filesize Limitation Note
- External Documentation:
- Accessing System Arg
- Git Bash in Python Terminal
- Intellisense & File Size Limit
- .pyc Files
- Configure Conda Environment
- Install Anaconda
- Add Conda Environment in PyCharm
- Install Packages in Anaconda
- Jupyter Notebook
- Configure Jupyter Server
- Comments & Markdown
- Operation Execution Order
- Monitor Memory Heap

